
The journey of a men‘s apparel design from a digital concept to a physical, wearable product is fascinating. For brands, understanding this journey is more than technical knowledge—it’s about building confidence in the quality of your final goods. Professional screen printing is a meticulous, multi-stage process. Each stage plays a critical role in ensuring the print is vibrant, durable, and perfectly placed. Let’s walk through this process in detail, highlighting what happens at every turn.
Artwork Preparation: The Digital Foundation
Everything begins with your design file. This stage, often called pre-press, is where many potential issues are resolved. Our technical team receives your artwork, typically a vector file (like .AI or .EPS). We examine it for print viability. Key tasks include checking color separation—ensuring each color in your design is isolated into its own layer. We also confirm that lines are crisp and there are no unintended overlaps. For designs with complex gradients or photorealistic images, we may discuss converting them to a printable halftone pattern. This careful preparation guarantees that the design translates perfectly from screen to fabric, avoiding fuzzy edges or color bleeding later on.
Screen Creation: The Heart of the Process
Once the artwork is ready, we create a unique stencil, or “screen,” for each color layer. A fine polyester mesh screen is stretched tightly over a frame. It is then coated with a light-sensitive emulsion and dried in a dark room. Next, each separated color film (a positive of your design) is placed on its screen. The screen is exposed to strong UV light. Where the light hits the emulsion through the clear parts of the film, it hardens. The areas blocked by the design remain soft. The screen is then washed with water, washing away the soft emulsion and leaving a perfect stencil of your design. This stencil is what allows ink to pass through in a specific pattern.
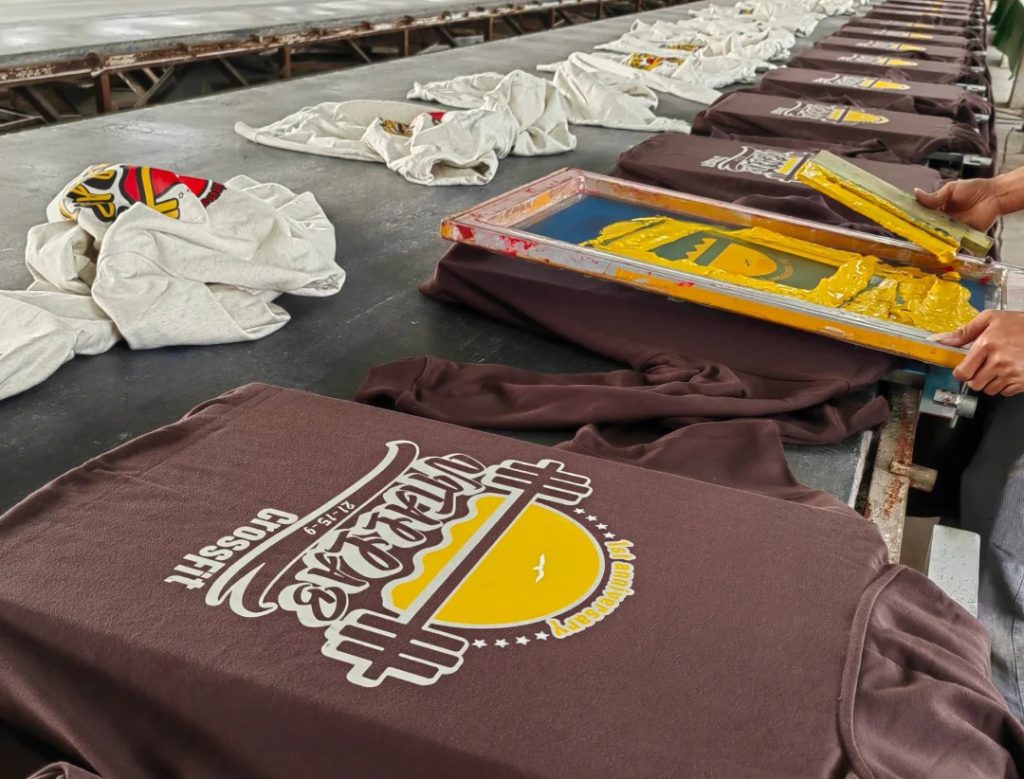
The Press Setup: Precision and Alignment
Before any ink touches fabric, the printing press must be meticulously set up. The garment—be it a polo shirt, a hoodie, or workwear—is placed on a dedicated pallet. Each screen, mounted on the press arm, is then aligned with laser precision over the garment. For multi-color designs, this registration process is paramount. We use registration marks from the films to ensure each color layer aligns perfectly with the next. A fraction of a millimeter off can ruin the clarity of the design. This setup phase requires patience and skill, but it is non-negotiable for achieving a professional, crisp result, especially on detailed logos for men‘s performance wear or branded corporate apparel.
Printing Execution: Applying the Ink
With everything aligned, printing begins. The screen is lowered onto the garment. Ink is poured at the top of the screen. Using a tool called a squeegee, the printer firmly pulls the ink across the screen with steady pressure. This action pushes the ink through the open mesh of the stencil and directly onto the fabric below. For a multi-color design, the garment moves to the next station where the process repeats with a different color screen. Modern automatic presses can handle this sequence with remarkable speed and consistency. The tactile, thick layer of ink deposited is what gives screen prints their characteristic feel and opacity.
Drying and Curing: Locking in Durability
A freshly printed garment is not yet finished. The ink, while on the fabric, is still in a semi-liquid state. Curing is the chemical process that solidifies it permanently. The garments travel on a conveyor through a long, heated curing tunnel. The precise temperature and dwell time are crucial and vary based on the ink type and fabric. This heat causes a reaction in the plastisol ink or cross-links the molecules in water-based inks, creating a permanent bond with the fabric fibers. Proper curing is what makes the print washable, crack-resistant, and durable. Skipping or rushing this step leads to prints that fade and degrade quickly.
Quality Assurance: The Final Check
Quality control is integrated throughout, but a final inspection is vital. After curing, samples from the production run are rigorously checked. We verify color accuracy against your original specifications. We inspect the print placement on the garment to ensure it‘s centered and positioned correctly. The hand feel and opacity of the print are assessed. We also perform a simple wash test on samples to confirm durability. Our goal is zero surprises for you. We ensure every piece that leaves our facility meets a consistent, high standard, so your brand can deliver reliable quality to its customers.
Understanding this process empowers you to make better design decisions and set realistic expectations. It also highlights the value of partnering with a manufacturer who masters each of these steps, turning your vision into a flawlessly executed product.